Create a React wallet connector
For the complete documentation index, see llms.txt
이 가이드에서는 DApp Connector API를 활용하여 Midnight 지갑에 연결하는 React 애플리케이션을 만들어 봅니다. 연결 상태와 지갑 주소를 보여주는 간단한 인터페이스를 구현하며, 이를 바탕으로 더 복잡한 DApp을 개발할 수 있습니다.
코드 예시는 핵심 기능에 집중하기 위해 CSS 스타일링을 포함하지 않습니다. Tailwind, styled-components, CSS 모듈 등 원하는 스타일링 도구를 자유롭게 적용하시면 됩니다.
Prerequisites
시작하기 전에 다음 사항을 준비하세요:
- TypeScript 및 JavaScript 기본 지식
- React 기초(컴포넌트, 상태, 훅)에 대한 이해
- Node.js와 npm 설치
- 브라우저에 Midnight 지갑 확장 프로그램 설치
Set up a React project
React 프로젝트가 없다면 Vite로 새 프로젝트를 생성합니다:
npm create vite@latest my-wallet-app -- --template react-ts
cd my-wallet-app
이어서 DApp Connector API 패키지를 설치합니다:
npm install @midnight-ntwrk/dapp-connector-api
이 튜토리얼을 마치면 다음 내용을 이해할 수 있습니다:
- Midnight 지갑 연결 흐름
- DApp Connector API 사용법
- React 애플리케이션에서 지갑 상태를 관리하는 모범 사례
Define TypeScript interfaces
먼저 컴포넌트에 필요한 타입을 정의합니다. 이 인터페이스를 통해 타입 안전성을 확보하고 컴포넌트 간 데이터 구조를 명확히 합니다.
src 디렉토리에 types.ts 파일을 생성하고 다음 코드를 추가합니다:
export interface WalletCardProps {
  isConnected: boolean;
  walletAddress: string | null;
  onConnect: () => void;
  onDisconnect: () => void;
}
WalletCardProps 인터페이스는 WalletCard 컴포넌트가 받는 데이터의 구조를 정의합니다.
연결 상태, 지갑 주소, 연결/연결 해제용 콜백 함수가 포함됩니다.
Create the WalletCard component
다음으로 지갑 연결 상태를 표시하고 연결/연결 해제 버튼을 제공하는 WalletCard 컴포넌트를 만듭니다.
src 디렉토리에 WalletCard.tsx를 생성하고 다음 코드를 추가합니다:
import React from "react";
import type { WalletCardProps } from "./types";

const WalletCard: React.FC<WalletCardProps> = ({
  isConnected,
  walletAddress,
  onConnect,
  onDisconnect,
}) => {
  return (
    <div>
      <div>
        <h2>Connection Status</h2>
        <div>
          {isConnected ? "Connected" : "Disconnected"}
        </div>
      </div>

      <div>
        {isConnected && walletAddress ? (
          <>
            <p>Wallet Address:</p>
            <p title={walletAddress}>{walletAddress}</p>
          </>
        ) : (
          <p>Please connect your wallet to proceed.</p>
        )}
      </div>

      <div>
        {isConnected ? (
          <button onClick={onDisconnect}>Disconnect Wallet</button>
        ) : (
          <button onClick={onConnect}>Connect Wallet</button>
        )}
      </div>
    </div>
  );
};

export default WalletCard;
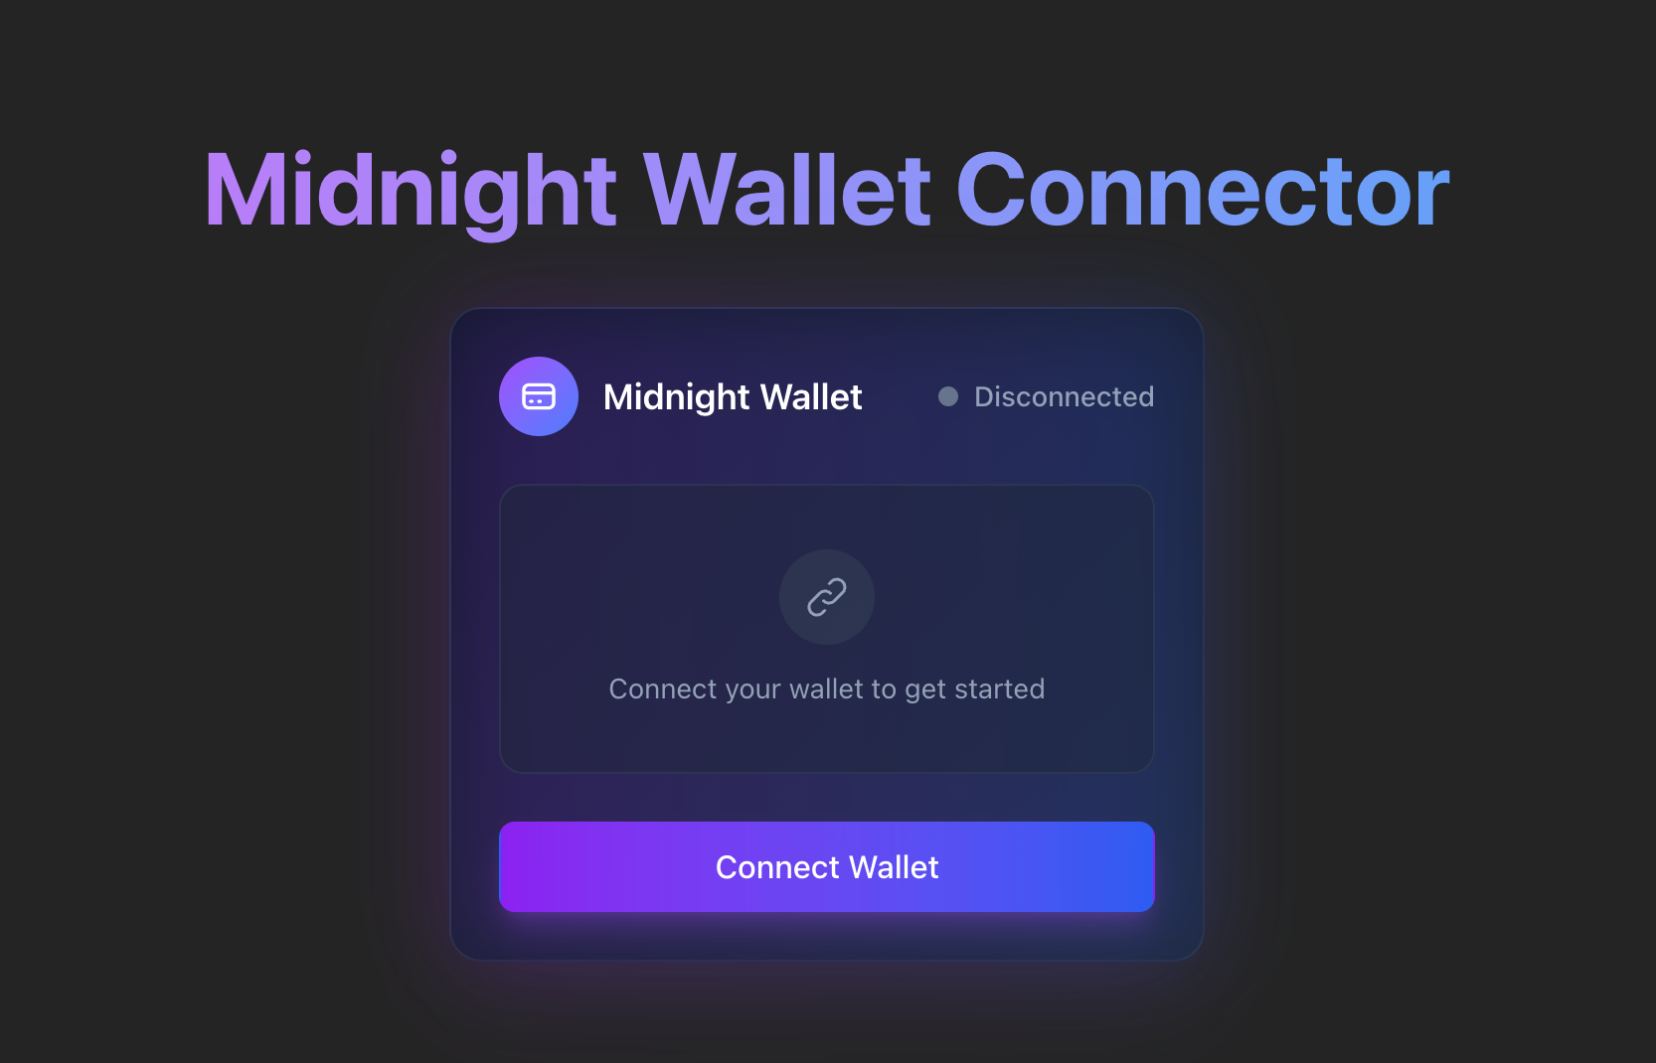
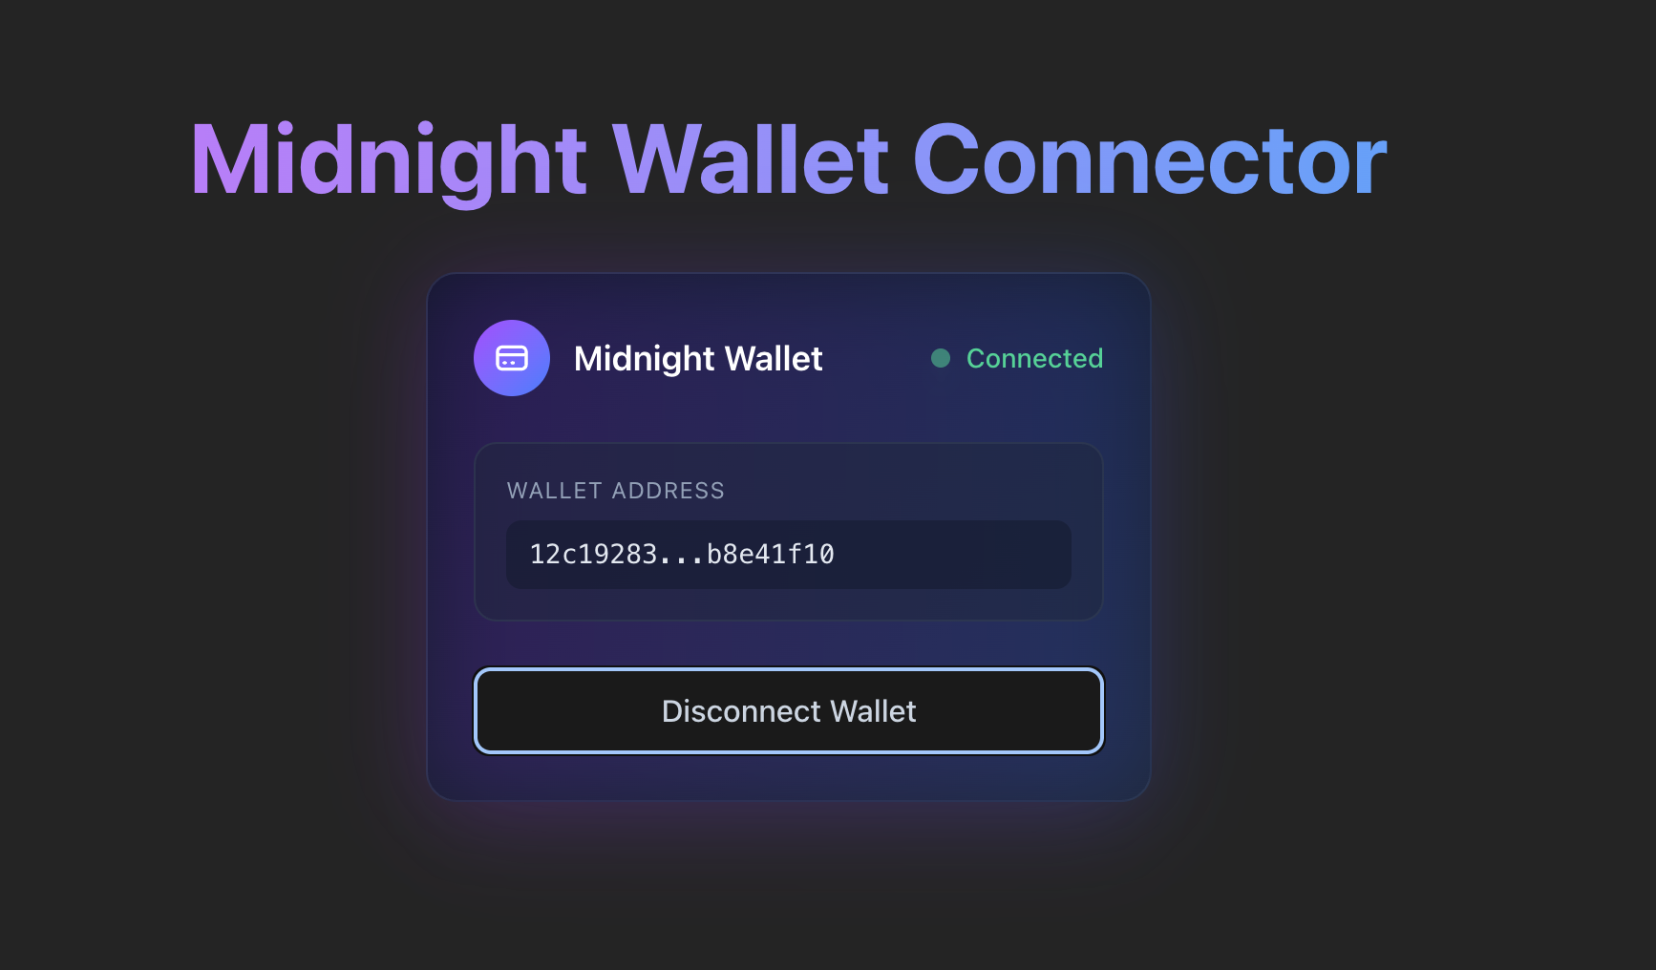
이 컴포넌트는 지갑 연결의 화면 표시를 담당합니다. 현재 연결 상태를 보여주고, 연결되면 주소를 표시하며, 상태에 맞는 동작 버튼을 렌더링합니다.
Select a wallet
지갑은 전역 window.midnight 객체 아래에 Initial API 인스턴스를 주입하는데, 이때 고정된 이름이 아니라 새로 생성된 UUID를 키로 사용합니다. 또한 한 브라우저에 여러 지갑이 동시에 존재할 수도 있습니다. 예를 들어 같은 seed phrase로 두 지갑을 불러온 경우가 그렇습니다. 그래서 하드코딩한 키를 찾는 대신 window.midnight의 항목을 읽어 그중 하나를 선택합니다.
src 디렉토리에 selectWallet.ts 파일을 생성하고 다음 코드를 추가합니다:
import type { InitialAPI } from '@midnight-ntwrk/dapp-connector-api';

export const listWallets = (): InitialAPI[] => {
  const injected = window.midnight;
  return injected ? Object.values(injected) : [];
};

export const selectWallet = (): InitialAPI => {
  const wallets = listWallets();

  if (wallets.length === 0) {
    throw new Error('No Midnight wallet found. Please install a Midnight wallet extension.');
  }

  return wallets[0];
};
selectWallet 함수는 설치된 지갑을 읽어 첫 번째 지갑을 반환합니다. 이렇게 하면 예시를 연결 흐름에만 집중할 수 있습니다. 지갑이 둘 이상일 때는 DApp Connector API 명세에 따라 임의로 고르지 말고 사용자가 직접 선택하도록 해야 합니다. listWallets로 선택지를 렌더링하되, 각 지갑을 표시할 때는 XSS를 방지하기 위해 name과 icon을 안전하게 렌더링하세요.
Integrate the DApp Connector API
이제 DApp Connector API와 이전 단계에서 만든 selectWallet 헬퍼로 지갑 연결 로직을 관리하는 App 컴포넌트를 작성합니다.
src 디렉토리의 App.tsx를 생성하거나 열고, 기존 코드를 다음으로 교체합니다:
import React, { useState } from 'react';
import WalletCard from './WalletCard';
import '@midnight-ntwrk/dapp-connector-api';
import { selectWallet } from './selectWallet';

const App: React.FC = () => {
  const [isConnected, setIsConnected] = useState<boolean>(false);
  const [walletAddress, setWalletAddress] = useState<string | null>(null);

  const handleConnect = async () => {
    console.log('Connect button clicked');
    let isConnected = false;
    let address = null;

    try {
      const wallet = selectWallet();

      // 지정된 네트워크에 연결 (로컬 개발의 경우 'undeployed' 사용)
      const connectedApi = await wallet.connect('preprod');

      // 지갑에서 unshielded 주소 가져오기
      const { unshieldedAddress } = await connectedApi.getUnshieldedAddress();
      address = unshieldedAddress;

      // 선택 사항: 서비스 URI 구성 가져오기
      const serviceUriConfig = await connectedApi.getConfiguration();
      console.log('Service URI Config:', serviceUriConfig);

      // 연결이 설정되었는지 확인
      const connectionStatus = await connectedApi.getConnectionStatus();
      if (connectionStatus.status === 'connected') {
        isConnected = true;
        console.log("Connected to the wallet:", address);
      }
    } catch (error) {
      console.log("An error occurred:", error);
    }

    setIsConnected(isConnected);
    setWalletAddress(address);
  };

  const handleDisconnect = () => {
    setWalletAddress(null);
    setIsConnected(false);
  };

  return (
    <div>
      <header>
        <h1>Midnight Wallet Connector</h1>
      </header>
      <main>
        <WalletCard
          isConnected={isConnected}
          walletAddress={walletAddress}
          onConnect={handleConnect}
          onDisconnect={handleDisconnect}
        />
      </main>
    </div>
  );
};

export default App;
지갑 연결 과정을 단계별로 살펴보겠습니다:
- 지갑 선택:
selectWallet헬퍼는window.midnight에 설치된 지갑을 읽어 연결할 지갑 하나를 반환합니다. 지갑을 찾지 못하면 예외를 던지며, 이는 감싸고 있는try/catch에서 처리됩니다. - 네트워크 연결:
connect()메서드에 네트워크 ID를 인자로 전달하여 호출합니다. 예시에서는'preprod'를 사용했습니다. 로컬 개발에는'undeployed', Preview 네트워크에는'preview'를 사용할 수 있습니다. - 주소 조회: 네트워크에 연결한 뒤
getUnshieldedAddress()메서드로 지갑의 unshielded 주소를 가져옵니다. shielded 주소는 애플리케이션에서 실제로 필요할 때만 요청하세요. - 상태 확인:
getConnectionStatus()로 연결 상태를 확인합니다. 이 메서드는status가'connected'또는'disconnected'인 객체로 resolve됩니다.
handleConnect 이벤트 핸들러가 이 모든 단계를 처리하고, 결과에 따라 컴포넌트 상태를 업데이트합니다.
사용자가 Connect Wallet 버튼을 클릭하면 지갑에서 연결 승인을 요청합니다.
Set up the entry point
React 애플리케이션의 진입점을 설정합니다. src 디렉토리의 main.tsx를 생성하거나 열고,
기존 코드를 다음으로 교체합니다:
import { StrictMode } from 'react';
import { createRoot } from 'react-dom/client';
import App from './App.tsx';

createRoot(document.getElementById('root')!).render(
  <StrictMode>
    <App />
  </StrictMode>,
);
마지막으로 프로젝트 루트의 index.html을 생성하거나 열고, 기존 코드를 다음으로 교체합니다:
<!doctype html>
<html lang="en">
  <head>
    <meta charset="UTF-8" />
    <meta name="viewport" content="width=device-width, initial-scale=1.0" />
    <title>Midnight Wallet Connector</title>
  </head>
  <body>
    <div id="root"></div>
    <script type="module" src="/src/main.tsx"></script>
  </body>
</html>
Run your application
진입점 설정을 마쳤으면 개발 서버를 시작합니다:
npm run dev
브라우저에서 로컬 개발 URL(보통 http://localhost:5173)에 접속합니다.
Connect Wallet을 클릭하면 지갑 확장 프로그램에서 연결 승인을 요청합니다.
승인하면 애플리케이션에 연결 상태와 지갑의 unshielded 주소가 표시됩니다.
Troubleshooting
자주 발생하는 문제와 해결 방법을 안내합니다.
Wallet not detected
window.midnight가 undefined이거나 No Midnight wallet found 에러가 나타나는 경우:
- 브라우저에 Midnight 지갑 확장 프로그램이 설치되어 있고 활성화되어 있는지 확인합니다.
- 확장 프로그램 설치 또는 활성화 후 페이지를 새로고침합니다.
- 고정된 키(예:
window.midnight.mnLace)가 아니라 열거 방식(Object.values(window.midnight))으로window.midnight에서 지갑을 읽고 있는지 확인합니다. 지갑은 Initial API를 UUID 키 아래에 주입하므로, 하드코딩한 이름은undefined로 해석됩니다. - 브라우저 콘솔에서 확장 프로그램 관련 에러를 확인합니다.
Connection fails
연결에 실패하는 경우:
connect()메서드에 지정한 네트워크 ID가 지갑에 설정된 네트워크 ID와 일치하는지 확인합니다.- 지갑이 잠금 해제 상태이고 동기화가 완료되었는지 확인합니다.
- 브라우저 콘솔에서 구체적인 에러 메시지를 확인합니다.
- DApp Connector API 패키지가 올바르게 설치되었는지 확인합니다.
Next steps
지갑 커넥터가 완성되었으므로, 다음과 같은 기능을 추가하여 애플리케이션을 확장해 보세요:
- 코인 전송: 다른 주소로 토큰을 전송하는 폼을 구현합니다.
- 메시지 서명: 지갑으로 임의 메시지에 서명할 수 있는 입력 기능을 추가합니다.
- 잔액 표시: 다양한 자산별 토큰 잔액을 표시합니다.
- 트랜잭션 기록: 트랜잭션 내역을 조회하고 표시합니다.
- 멀티 네트워크 지원: 여러 Midnight 네트워크 간에 전환할 수 있는 네트워크 선택기를 추가합니다.